Singer 7258 Sewing Machine Manual: A Comprehensive Guide
Discover the power and versatility of your Singer 7258! This manual provides detailed instructions‚ troubleshooting‚ and maintenance tips for optimal sewing experiences.
Welcome to the world of creative sewing with the Singer 7258! This robust and reliable machine is designed for both beginners and experienced sewists‚ offering a blend of user-friendly features and powerful performance. As a cornerstone of the renowned SINGER brand – a household name since the 1850s – the 7258 builds upon a legacy of quality and innovation.
This comprehensive sewing machine boasts 32 built-in stitches‚ providing versatility for a wide range of projects‚ from simple alterations to complex garment construction. The Singer 7258 is engineered for durability and ease of use‚ making it a fantastic addition to any sewing room. This manual will guide you through every aspect of operating and maintaining your new machine‚ ensuring years of enjoyable sewing.
Key Features and Specifications
The Singer 7258 is packed with features designed to enhance your sewing experience. It offers 32 built-in stitches‚ including decorative‚ stretch‚ and zigzag options‚ catering to diverse project needs. A standout feature is its heavy-duty metal frame‚ ensuring stability and longevity even with frequent use. The machine boasts an adjustable stitch length and width‚ providing customization for various fabrics and techniques.
Specifications include: a maximum sewing speed‚ a 6.4mm stitch width‚ and a drop-in bobbin system for easy setup. It’s compatible with SINGER Class 15 bobbins. The free arm functionality simplifies cuff and sleeve sewing. This machine is designed to handle a variety of fabrics‚ from lightweight silks to heavier denim‚ making it a versatile choice for all sewists.
Unboxing and Initial Setup
Carefully unpack your Singer 7258 sewing machine‚ ensuring all components are present. These typically include the machine itself‚ power cord‚ foot control‚ various presser feet‚ bobbins‚ needle set‚ screwdriver‚ seam ripper‚ and this manual. Inspect for any shipping damage before proceeding.
Initial setup involves connecting the power cord and foot control. Place the machine on a stable‚ flat surface with adequate lighting. Attach the power cord to the machine and plug it into a grounded outlet. Connect the foot control. Before sewing‚ ensure the machine is properly threaded (refer to the threading section) and the bobbin is correctly inserted. Familiarize yourself with the basic controls before your first project!
Parts Identification
Let’s identify the key components of your Singer 7258. The Power Switch controls operation‚ while the Speed Control adjusts sewing pace. The Handwheel allows manual needle positioning. The Bobbin Winder prepares bobbins for use. The Stitch Selection Dial chooses desired stitch patterns.
Essential parts include the Presser Foot (and shank)‚ securing fabric‚ and the Presser Foot Lifter‚ raising/lowering it. The Needle Clamp Screw secures the needle. Locate the Thread Tension Dial‚ controlling thread tightness. The Bobbin Case holds the bobbin. Familiarize yourself with the Reverse Lever for backstitching and the Accessory Tray for storage. Understanding these parts is crucial for operation and maintenance.
Powering On and Basic Operation
To begin‚ ensure the power switch is in the “Off” position. Connect the power cord to a grounded outlet. Turn the power switch “On”; Gently depress the foot pedal to start sewing; the harder you press‚ the faster the machine operates. Always use a properly installed needle and threaded machine.
For basic operation‚ raise the presser foot using the presser foot lifter. Place fabric under the presser foot‚ lowering it gently. Guide the fabric with both hands‚ maintaining a consistent speed. Use the reverse lever for backstitching at the beginning and end of seams. Remember to always turn the machine off and unplug it when not in use.
Threading the Machine
Proper threading is crucial for successful sewing. Begin with the machine turned off. Raise the presser foot – this disengages the tension discs. Guide the thread from the spool pin‚ through the first thread guide‚ and around the tension discs. Continue threading through the take-up lever‚ ensuring the thread is securely seated.
Next‚ thread the needle from front to back. Pull several inches of thread through the needle eye. Hold onto the thread tail while lowering the presser foot and gently pulling on the thread. This confirms correct threading and brings the bobbin thread up. Refer to the threading diagram printed on the machine for visual guidance.
Winding the Bobbin
To wind the bobbin‚ place the thread spool on the spool pin. Guide the thread through the thread guide and then onto the bobbin. Place the bobbin onto the bobbin winder spindle‚ ensuring it clicks into place. Push the bobbin winder to the right to engage it.
Hold the thread tail firmly for the first few rotations to prevent slipping. Press the foot pedal gently to start winding. The machine will automatically stop when the bobbin is full. Remove the bobbin‚ cut the thread‚ and you’re ready to insert it into the machine. Always use genuine Singer bobbins for optimal performance.
Inserting the Bobbin
With the machine powered off‚ locate the bobbin case. Open the bobbin cover plate on the underside of the sewing machine. Gently pull out the bobbin case. Insert the wound bobbin into the bobbin case‚ ensuring the thread unwinds in a clockwise direction.
Guide the thread through the tension slot on the bobbin case. Reinsert the bobbin case back into the machine until it clicks securely. Close the bobbin cover plate. Finally‚ draw up the bobbin thread by holding the needle thread and gently turning the handwheel towards you. Proper bobbin insertion is crucial for consistent stitch quality.
Stitch Selection and Adjustment
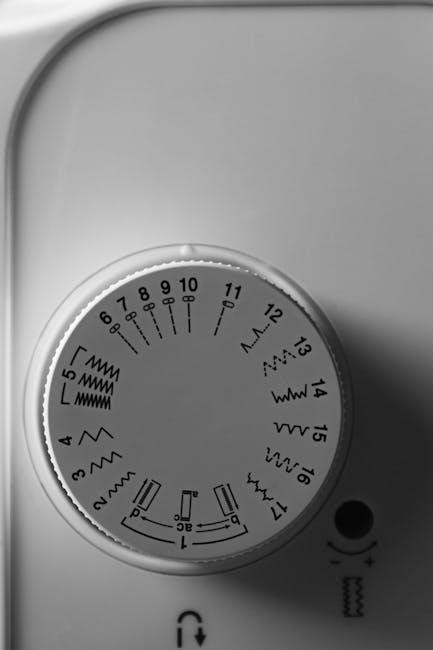
The Singer 7258 boasts 32 built-in stitches‚ offering versatility for various projects. To select a stitch‚ use the stitch selection dial located on the front of the machine. Refer to the stitch chart printed on the machine for visual guidance. Each stitch number corresponds to a specific pattern.
For customized sewing‚ adjust the stitch length and width using the corresponding dials. Shorter stitch lengths are ideal for delicate fabrics‚ while longer lengths suit heavier materials. Stitch width controls the zigzag pattern’s breadth. Experiment with different settings to achieve desired results. Always test stitches on scrap fabric before starting your project.
Adjusting Stitch Length and Width
Precise control over your stitches is achieved through the length and width adjustment dials on the Singer 7258. The stitch length dial‚ typically marked with numbers‚ determines the distance between each stitch. Lower numbers create shorter‚ denser stitches‚ perfect for delicate fabrics or reinforcing seams. Higher numbers yield longer stitches‚ suitable for basting or heavier materials.
The stitch width dial controls the side-to-side deviation of stitches‚ primarily affecting zigzag patterns. A setting of ‘0’ produces a straight stitch‚ while increasing the number widens the zigzag. Experimentation is key! Always test adjustments on scrap fabric mirroring your project material to ensure optimal stitch appearance and strength before beginning your work.

Using Built-in Stitches
The Singer 7258 boasts a variety of built-in stitches‚ expanding your creative possibilities beyond the standard straight and zigzag. Access these stitches via the stitch selection dial‚ referencing the stitch guide chart printed on the machine. Each stitch is numbered and illustrated‚ detailing its ideal application – from decorative embellishments to functional seam finishes.
Explore options like blind hems‚ buttonholes‚ and stretch stitches. Remember to adjust stitch length and width appropriately for each stitch type‚ as indicated in the manual. Test each stitch on scrap fabric before using it on your project. Understanding the purpose of each stitch unlocks the full potential of your Singer 7258‚ allowing for diverse and professional-looking results;
Changing the Presser Foot
To change the presser foot on your Singer 7258‚ begin by ensuring the machine is turned off. Locate the presser foot lever at the back of the presser foot holder and lift it up. This releases the currently attached foot. Gently press the release button‚ usually located at the front of the presser foot holder‚ and the foot will detach.
Align the new presser foot with the presser foot holder‚ ensuring it clicks securely into place. Lower the presser foot lever to confirm it’s properly attached. Different presser feet are designed for specific tasks‚ like zippers‚ buttonholes‚ or quilting. Refer to your manual for a complete list of compatible feet and their intended uses‚ maximizing your sewing capabilities.
Available Presser Feet and Their Uses
The Singer 7258 offers a variety of presser feet to expand your sewing possibilities. The Standard Foot is ideal for everyday sewing. The Zipper Foot allows precise stitching close to zipper teeth. A Buttonhole Foot automates buttonhole creation‚ ensuring consistent results. The Button Sewing Foot simplifies attaching buttons securely.
For decorative work‚ consider the Decorative Foot or Quilting Foot. An Overcasting Foot prevents fabric fraying. The Blind Hem Foot creates invisible hems. Explore specialized feet like the Gathering Foot for ruffles or the Roller Foot for leather. Refer to your manual for detailed instructions on each foot’s proper usage and compatibility with different fabrics and techniques.
Troubleshooting Common Issues
Encountering problems with your Singer 7258 is common‚ but often easily resolved. Thread breakage can stem from incorrect threading‚ a dull needle‚ or improper tension. Machine jamming frequently occurs due to fabric buildup in the bobbin area – clean it thoroughly! Needle problems‚ like bending or breaking‚ suggest using the correct needle type for your fabric.
If the machine isn’t sewing‚ re-thread both the top and bobbin threads‚ ensuring proper insertion. Check the presser foot is down‚ as this activates the sewing mechanism. Consult the manual’s troubleshooting section for specific error codes or symptoms. Regular maintenance‚ like cleaning and oiling‚ prevents many issues from arising.

Needle Problems
Addressing needle issues is crucial for smooth sewing with your Singer 7258. A broken needle often indicates forcing the fabric‚ using the wrong needle type‚ or encountering a pin. Always replace a bent or damaged needle immediately to prevent further machine damage. Ensure the needle is correctly inserted – flat side to the back!
Selecting the appropriate needle for your fabric is vital. Universal needles work for woven fabrics‚ while ballpoint needles are best for knits. Denim needles handle heavier materials. Regularly changing your needle (after 8 hours of sewing) maintains stitch quality. If the needle continually breaks‚ check your threading and tension settings.

Thread Breakage
Frequent thread breakage with your Singer 7258 can be frustrating‚ but often has a simple solution. First‚ re-thread the machine‚ ensuring the presser foot is up during threading – this opens the tension discs. Incorrect threading is a primary cause. Also‚ verify you’re using a quality thread compatible with your fabric type.
Check the needle; a dull or damaged needle can cause thread to snap. Ensure the needle size matches your fabric weight. Improper tension settings are another common culprit. Experiment with slightly loosening or tightening the upper tension. Finally‚ confirm the bobbin is wound evenly and inserted correctly. A poorly wound bobbin leads to inconsistent tension and breakage.
Machine Jamming
If your Singer 7258 sewing machine jams‚ immediately stop and do not force the fabric. This can cause damage. First‚ raise the presser foot and needle to their highest positions. Gently remove the fabric‚ carefully disentangling it from the needle and feed dogs;
Inspect the bobbin area for tangled threads or fabric scraps. Clear any obstructions meticulously. Ensure the bobbin is correctly inserted and the thread path is clear. A common cause is attempting to sew over thick seams or multiple layers of fabric without adjusting the stitch length or using a heavier needle. Regularly cleaning lint buildup around the bobbin case and feed dogs prevents jamming.
Maintenance and Cleaning
Regular maintenance ensures your Singer 7258 operates smoothly and extends its lifespan. Always unplug the machine before cleaning! Use a soft brush to remove lint and dust from the bobbin area‚ feed dogs‚ and around the needle plate after each use. A small vacuum cleaner attachment can also be helpful.
Periodically‚ wipe down the exterior of the machine with a damp cloth. Avoid harsh chemicals or abrasive cleaners. Never oil the machine excessively; a few drops in the designated oiling points (refer to the manual’s diagram) are sufficient. Consistent cleaning prevents thread buildup and ensures accurate stitching. Ignoring maintenance can lead to malfunctions and reduced performance.
Oiling the Machine
Proper lubrication is crucial for the Singer 7258’s longevity and smooth operation. Always unplug the machine before oiling! Locate the designated oiling points – typically indicated in your machine’s manual with a small oil can symbol. Use only sewing machine oil; other lubricants can damage internal components.
Apply a small drop of oil to each point‚ ensuring it reaches the moving parts. Avoid over-oiling‚ as excess oil attracts dust and lint. After oiling‚ operate the machine slowly for a few minutes to distribute the lubricant. Regular oiling (every few hours of use‚ or as recommended in the manual) minimizes friction and prevents wear and tear‚ keeping your Singer 7258 running efficiently.
Cleaning the Bobbin Area
Maintaining a clean bobbin area is vital for consistent stitch quality on your Singer 7258. Regularly remove the bobbin case and inspect for lint‚ thread fragments‚ and dust accumulation. Use the provided brush (or a soft toothbrush) to gently dislodge debris. A vacuum cleaner with a brush attachment can also be helpful‚ but use low suction;
Avoid using compressed air‚ as it can push debris further into the mechanism. Carefully wipe the bobbin case and surrounding area with a lint-free cloth. Ensure the feed dogs are also clear of lint. A clean bobbin area prevents thread nests‚ skipped stitches‚ and ensures smooth bobbin winding and operation‚ extending the life of your machine.
Advanced Features and Techniques
Unlock the full potential of your Singer 7258 with its advanced capabilities! Explore features like the needle threader for effortless threading‚ saving time and frustration. Master free-arm sewing for cuffs‚ sleeves‚ and other cylindrical projects‚ offering enhanced maneuverability.
Experiment with different presser feet (sold separately) to expand your sewing possibilities – quilting‚ buttonholes‚ and decorative stitching become easier. Utilize the adjustable stitch length and width for customized designs. Consider advanced techniques like appliqué and free-motion quilting to truly personalize your creations. The Singer 7258 empowers you to tackle complex projects with confidence and precision.
Using the Needle Threader
Simplify the threading process with the Singer 7258’s built-in needle threader! First‚ ensure the machine is turned off. Raise the needle to its highest position using the handwheel. Place the thread into the guide‚ then gently push and release the lever. The threader will automatically loop the thread through the needle’s eye.
If the thread doesn’t go through on the first attempt‚ try again‚ ensuring the thread is securely positioned in the guide. This feature is particularly helpful for those with visual impairments or dexterity challenges. Regularly check the threader mechanism for lint or debris to maintain optimal performance. Mastering this feature saves time and enhances your sewing experience.
Free Arm Sewing
Unlock greater versatility with the Singer 7258’s free arm feature! Simply remove the extension table to reveal the free arm – ideal for sewing cuffs‚ sleeves‚ pant legs‚ and other cylindrical items. This allows for easy maneuvering of fabric around the needle‚ providing precise control and professional-looking results.
When using the free arm‚ ensure the fabric is positioned correctly to prevent bunching or uneven stitching. Adjust the stitch settings as needed for the specific fabric and project. The free arm is a valuable tool for garment construction and creative sewing projects‚ offering enhanced accessibility and convenience. Practice makes perfect – experiment to master this technique!
Safety Precautions
Prioritize safety when operating your Singer 7258. Always disconnect the power supply before changing the needle‚ threading‚ or performing any maintenance. Keep fingers away from moving parts‚ particularly the needle and presser foot‚ to prevent injury.
Never force the fabric under the needle; let the machine feed it naturally. Use the correct needle type and size for your fabric to avoid breakage and potential hazards. Ensure the machine is stable and on a level surface during operation. Supervise children closely when they are near the sewing machine. Regularly inspect the power cord for damage and avoid using it if frayed or exposed wires are present.
Warranty Information
Your Singer 7258 sewing machine is covered by a limited warranty‚ protecting against defects in materials and workmanship. The standard warranty period is typically one year from the date of original purchase‚ though this can vary by retailer and region. Please retain your proof of purchase‚ as it is required for all warranty claims.
The warranty covers mechanical failures under normal household use. It does not cover damage caused by misuse‚ accidents‚ alterations‚ or lack of proper maintenance. To initiate a warranty claim‚ contact Singer customer support or an authorized Singer service center. Refer to the separate warranty card included with your machine for complete details and specific terms and conditions;
Resources and Support
Need assistance with your Singer 7258? Singer offers a wealth of resources to support your sewing journey! Visit the official Singer website (www.singer.com) for frequently asked questions‚ downloadable manuals‚ and helpful sewing tips. You can also find instructional videos demonstrating various techniques and machine features.
For direct support‚ contact Singer’s customer service team via phone or email. Their knowledgeable representatives can assist with troubleshooting‚ warranty inquiries‚ and locating authorized service centers. Additionally‚ explore online sewing communities and forums where fellow Singer users share advice and solutions. Don’t hesitate to leverage these valuable resources to maximize your sewing experience!
Be First to Comment